Having the Option Variation feature in your product postings allows your buyers to choose their preferred sizes or colors. The following is how to setup color, size and variant options.
For edit the Color, Size and Variant options, kindly refer here.
1. Login to your Lelong.my account.
2. Under Seller Dashboard, choose “B. My Selling”. Then, click “3. Edit Listing Beta”.
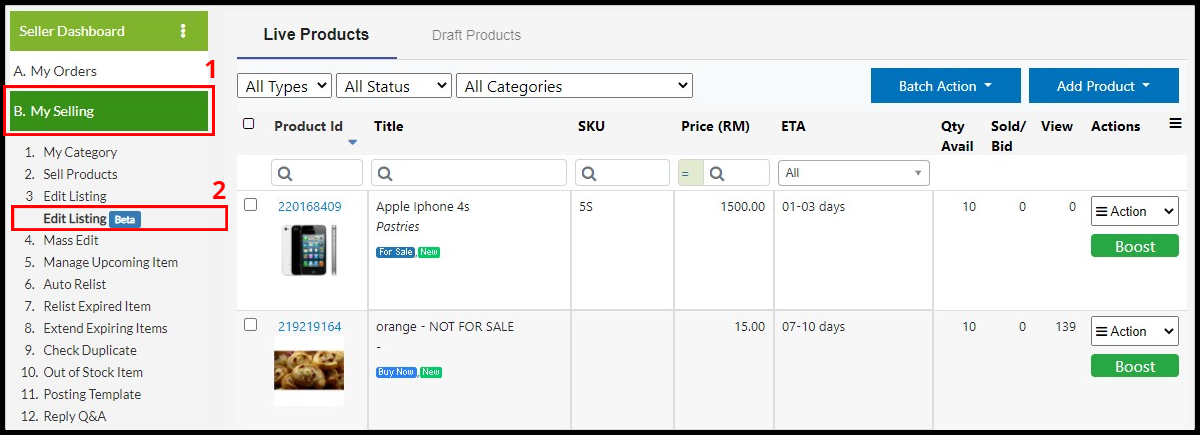
3. Choose posting that you want to do option. Then, under drop list Action box choose “Colors / Sizes”.
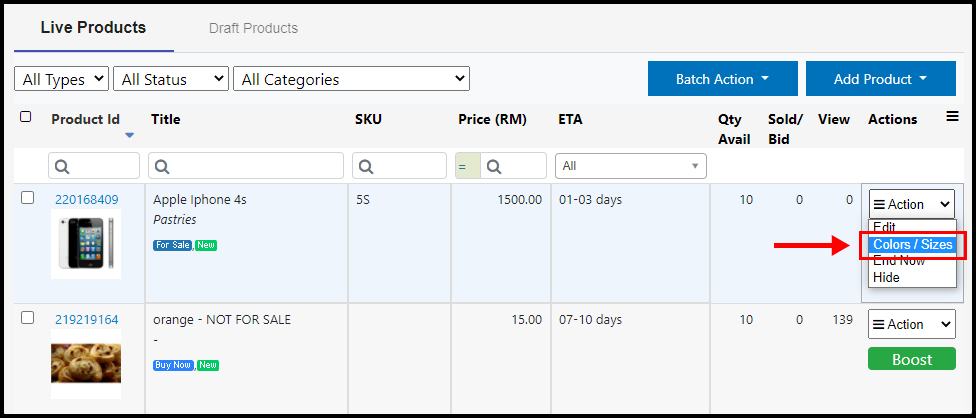
4. After you click “Colors / Sizes”, you will be directed to color / size setup page.
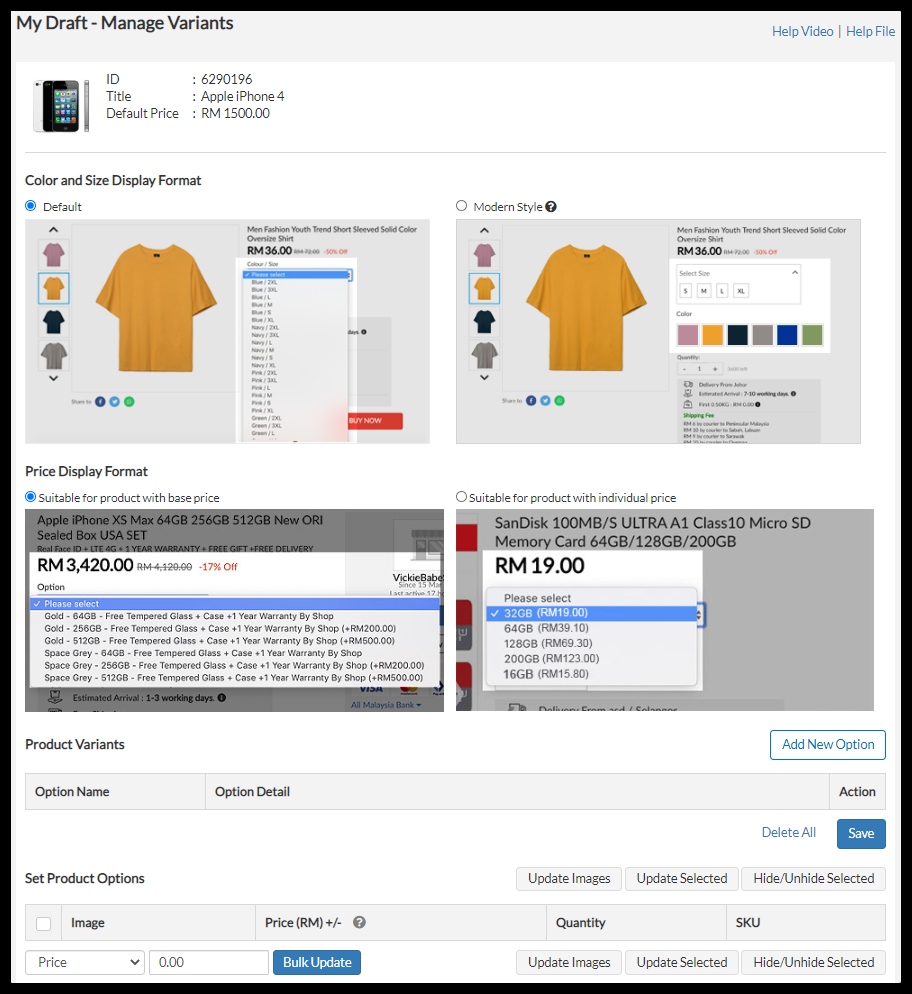
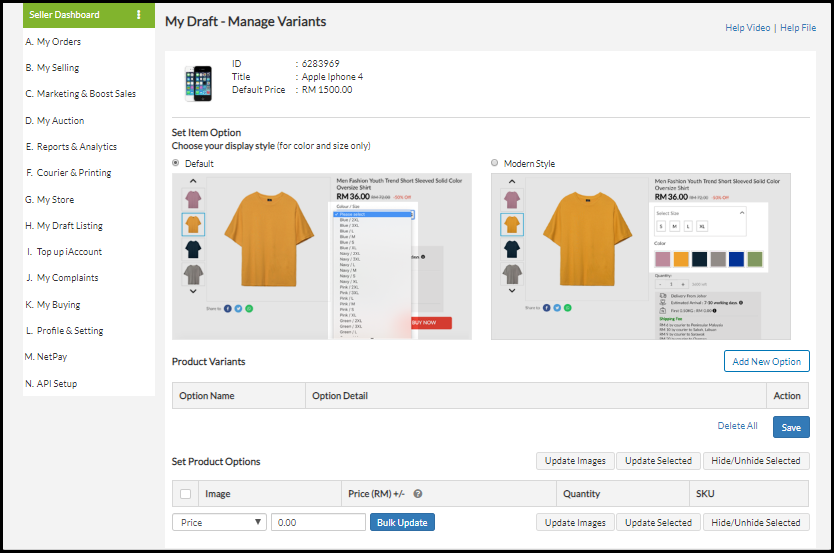
5. In this page, you may select your preferred display style either by default or modern at Set Item Option Section (A).
Also you may choose Price Display Format (B) that suitable with your product either base price or individual price.
- For product with base price, suits for the same product but with many different attributions such as model type, capacity, color and size.
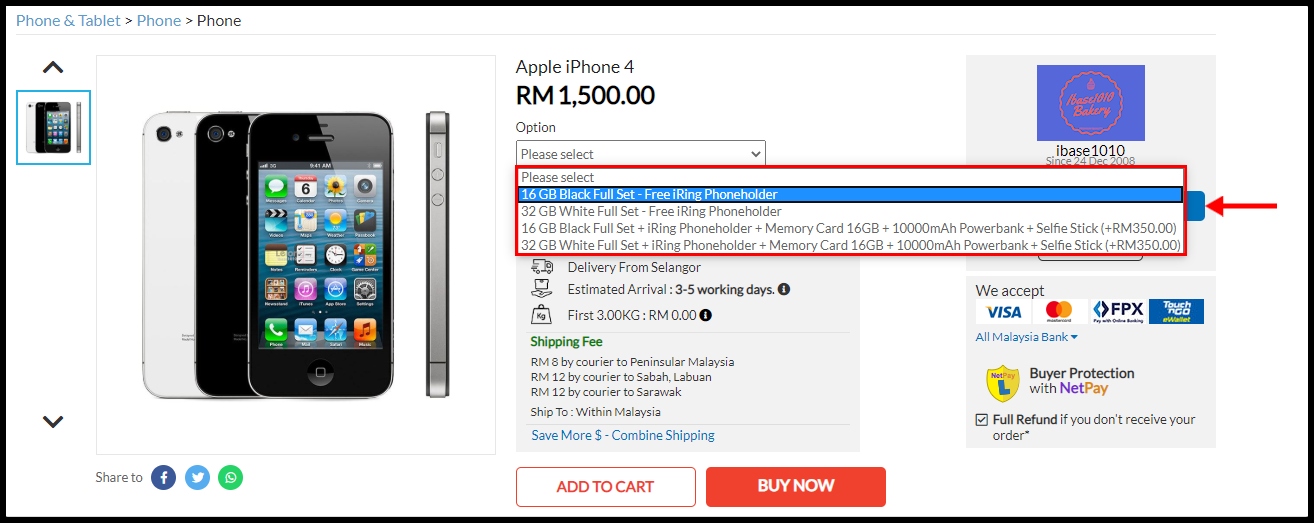
Example 1 :
If you offer a particular model of mobile phone in 4 colors ( black, white, silver, and red ) and 3 storage capacities ( 8GB, 16GB, and 32GB ).
Example 2:
If you offer a same model of mobile phone with variants to allow for customers to choose between multiple deals options.
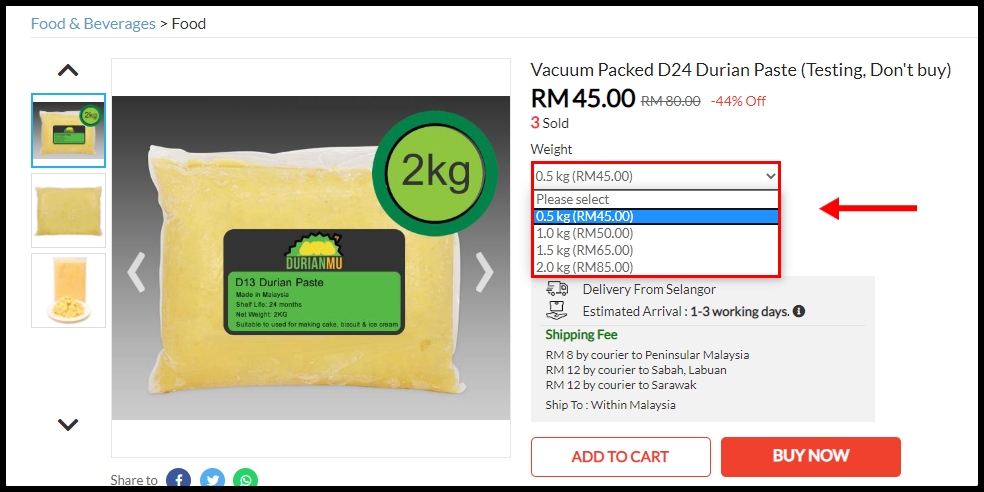
- For product with individual price, suits well for the same product but has only one or more different attribution.
Example 1 ( Default Style ):
Same product with different weight. For example, the product below is Vacuum Packed D24 Durian Paste with different weight such as 0.5kg, 1.0 kg, 1.5 kg and 2.0 kg.
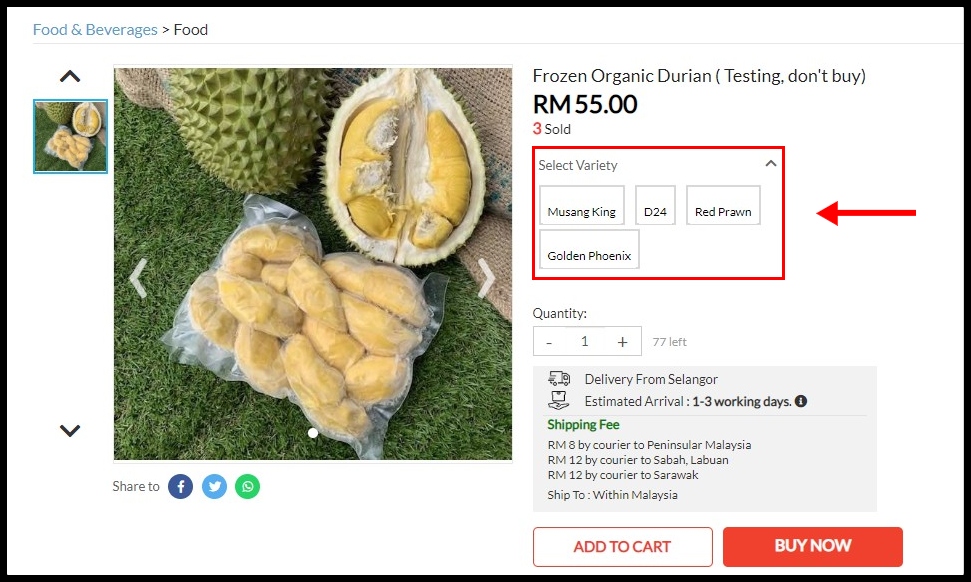
Example 2 (Modern Style):
Durian fruit with different types such as Musang King, D24, Red Prawn and Golden Phoenix.
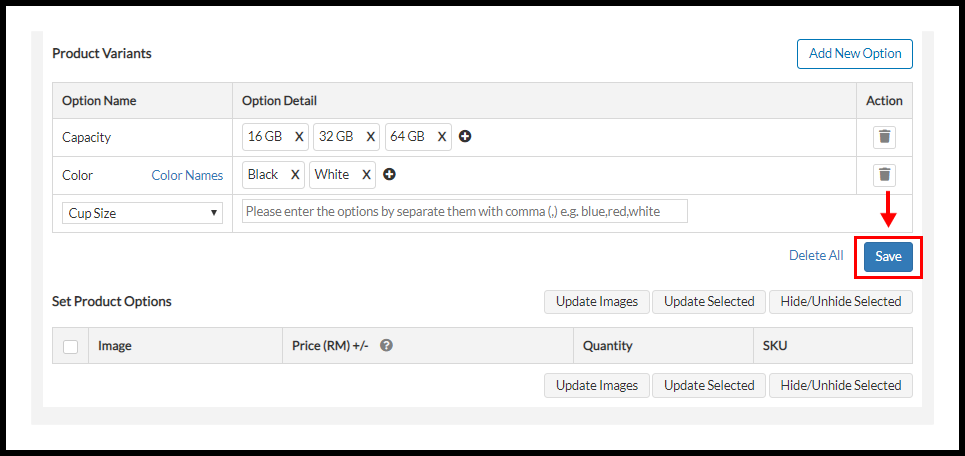
Then, click “Add New Option” (C) to add option (e.g.: Color, Capacity, Cup Size, Size, Volumetric or Others ).

6. Next, select your preferred Option Name (A) and key in the Option Detail (B). For example, we go for option color and at the “Option Detail” key in the option Black & White. If you have multiple options, you need to separate them with a comma (,). Then, click cursor anywhere in this page.

7. You may add other option name by click the drop down button and select your preferred option. In this case, we go for option Capacity.

8. At the “Option Detail” key in the option detail for capacity (ex : 16 GB, 32 GB & 64GB). If you have multiple capacity, you need to separate them with a comma (,). Then, if you do not have any other option to be added, you may click “Save” button.
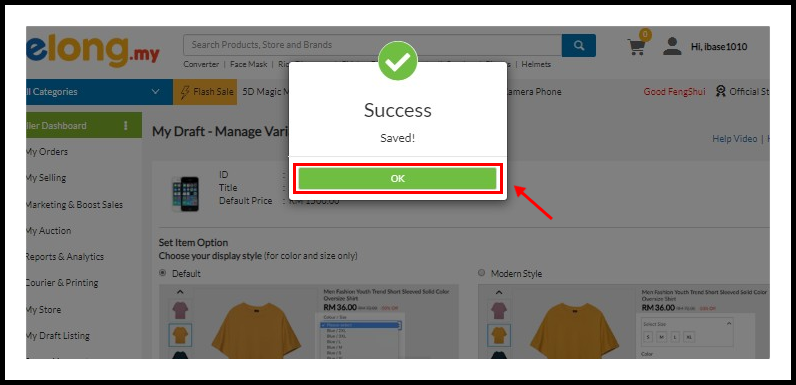
9. After you click on “Save”, page will appear as per below. Click “OK” and your option will be generated.
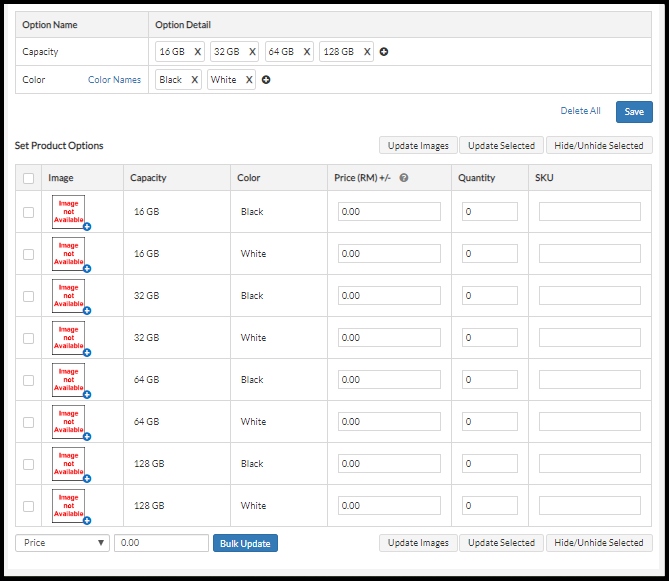
10. After that a setup page for variants will appear as per below.
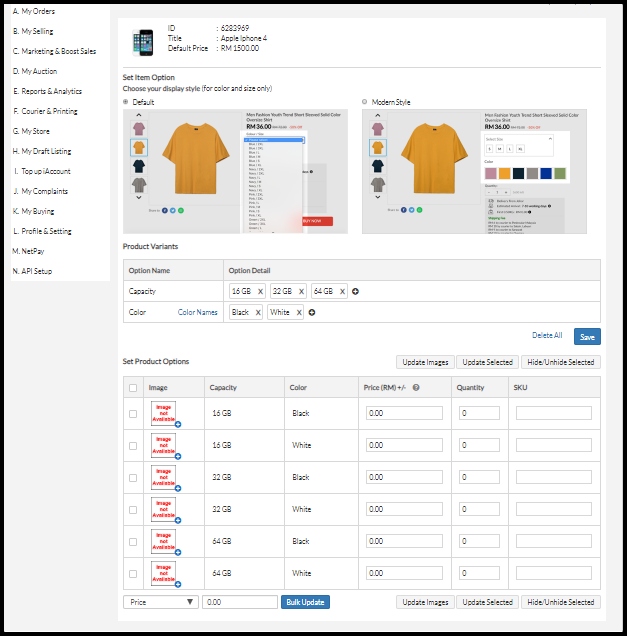
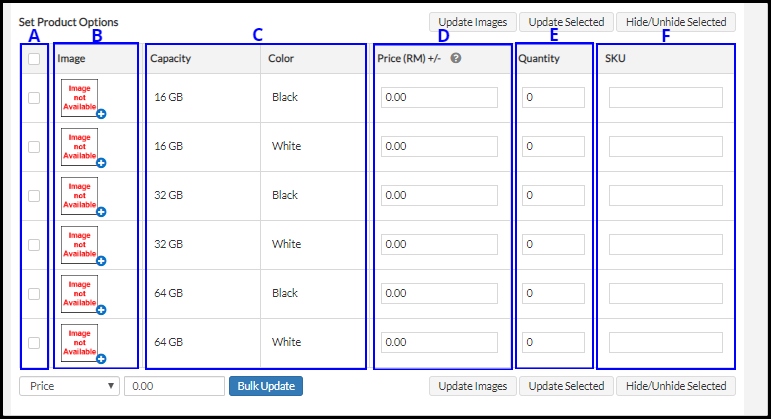
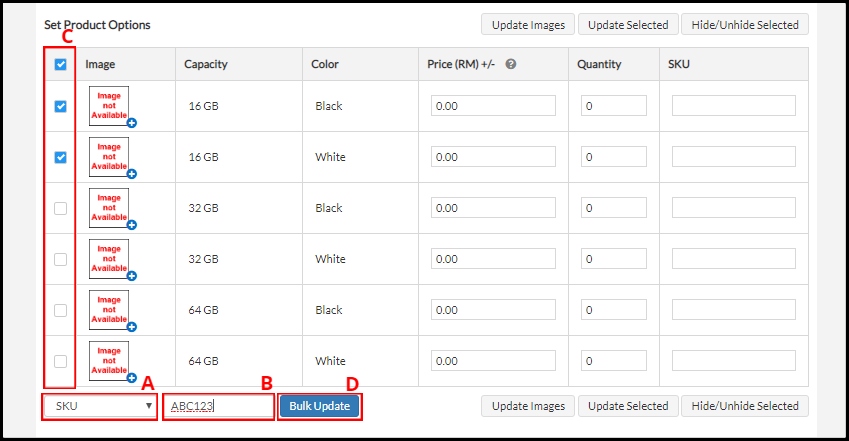
11. Next, you need to setup your option such as images, price, quantity, SKU and hide/ unhide in Set Product Options section.
A. You may tick first box to select all the option list, or you may click selected box to update certain list.
B. Once you updated your images, it will appear in your image section. You may click (+) to update images.
C. Your product option generated from Product Variants section.
D. You may increase and decrease the price according to product option criteria. Put (+) before price for price increase and put (-) for price decrease.
E. For product option quantity, you update here. If the quantity is “0”, it may appear as Sold Out Item.
F. You may enter product option SKU (Stock Keeping Unit) here.
Bulk Update for Products Variance’s Price, Quantity and SKU
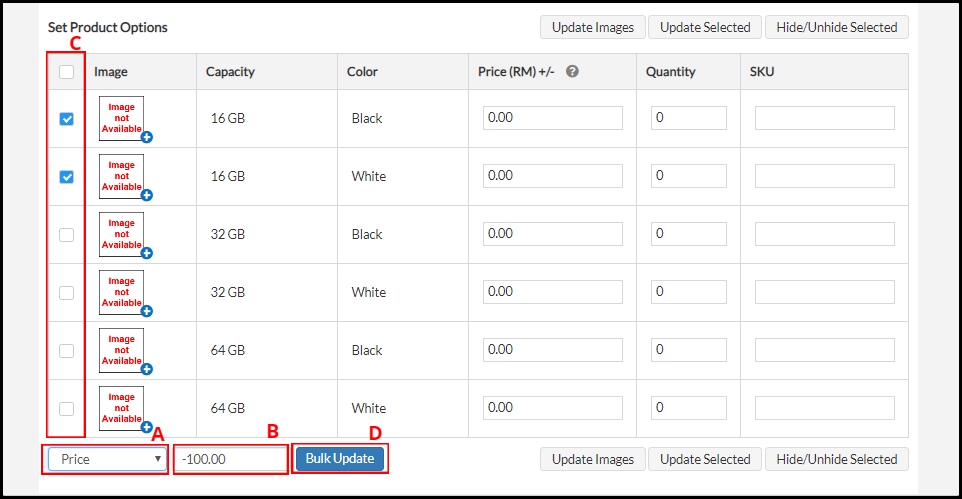
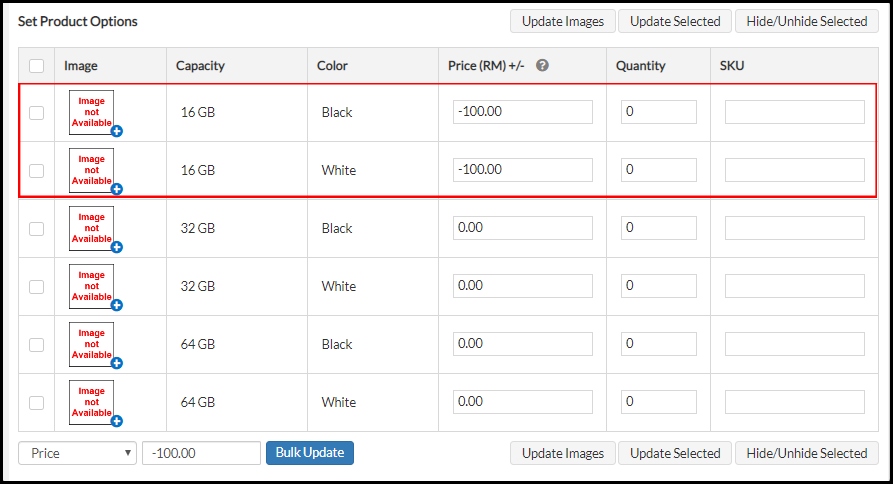
a. Bulk Update for Price
A) At the drop box list, choose Price option.
B) Insert amount for product variant’s price.
NOTE: Default Price +/- Price Difference = New Variant Product Price
If you may need to increase or decrease the price for variant’s product just insert the Price Difference. For example, in this case you want to decrease RM100 for both Apple Iphone 4 (White 16 GB) and Apple Iphone 4 (Black 16 GB). Thus you need to insert “-100” to price column and the price for Test Item Variance Posting (White 16 GB) (Black 16 GB) will be shown RM 1, 400 in “Product Detail” page.
C) Tick the box on the left side for option you have update the quantity.
D) Then, click “Bulk Update” button.
After you click on “Bulk Update”, page will appear as per below. Click “OK” and your option will be generated.
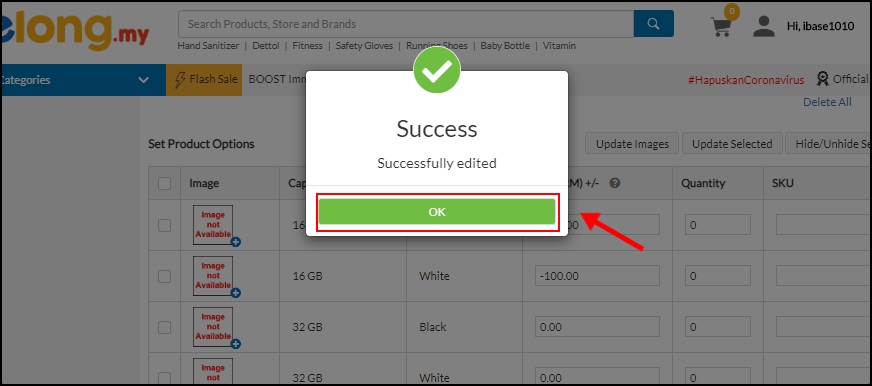
Your price has been updated.
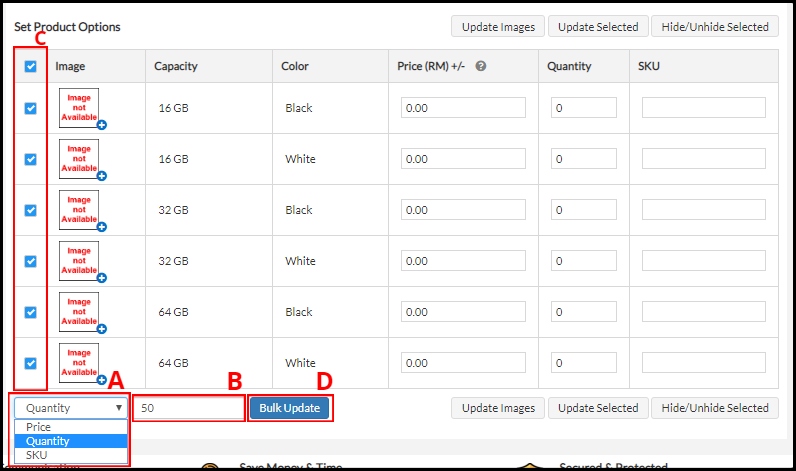
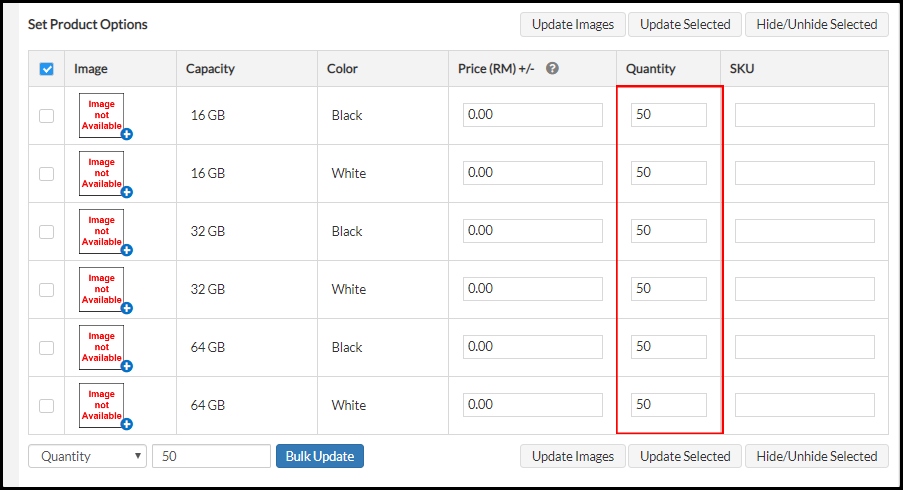
b. Bulk Update for Quantity
A) At the drop box list, choose Quantity option.
B) Key in your stock in hand or available quantity.
C) Tick the box on the left side for option you have update the quantity.
D) Then, click “Bulk Update” button.
After you click on “Bulk Update”, page will appear as per below. Click “OK” and your option will be generated.
Your price has been updated.
c. Bulk Update for SKU
A. At the drop box list, choose SKU option.
B. Key in the SKU. The SKU must be in unit.
C. Tick the box for option that you wish edit the SKU.
D. Click “Bulk Update”.
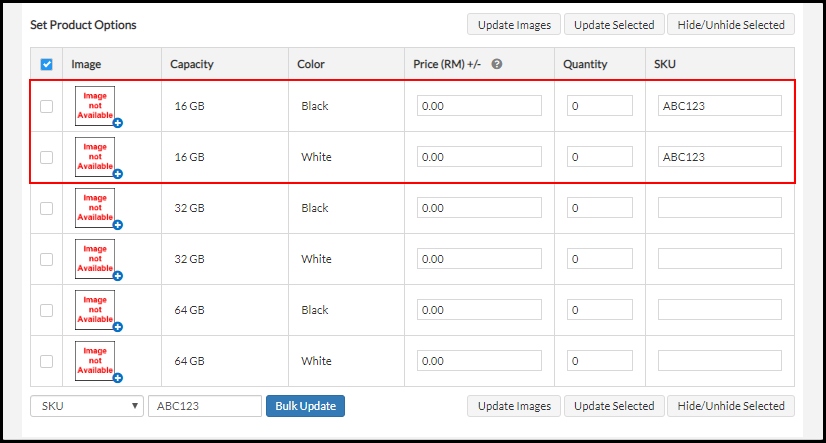
After you click on “Bulk Update”, page will appear as per below. Click “OK” and your option will be generated.
The SKU will be updated at the column “SKU”.
Adding/ Removing Item Options
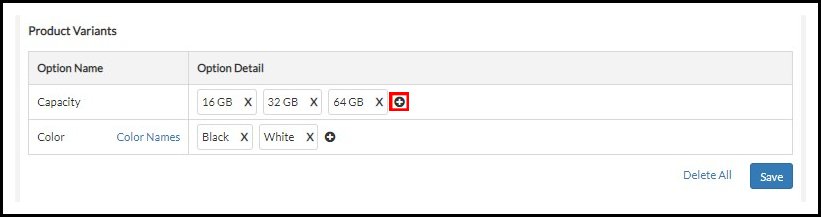
To add in or remove “Option Detail”, click on the “+” or “x” icon under “Option Detail”
a. “+” icon is to add new option detail
i) Click on the “+” icon.
ii) Update the new option you would like to add in to the pop-up window. Then click cursor anywhere in the page. For example, we add option for capacity 128 GB. Then, click cursor anywhere in this page and your new variant has successfully added.
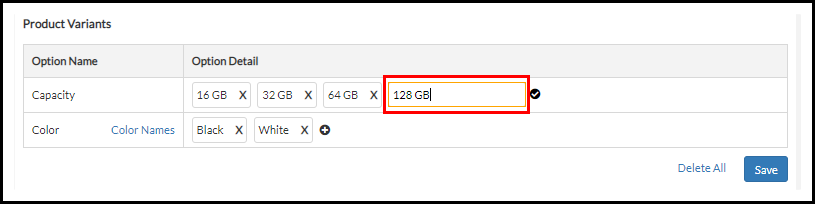
iii) Your new variant has successfully added as following.
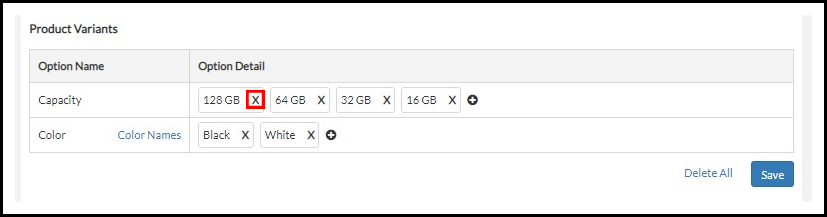
b. “X” icon is to remove existing option detail.
i) Click on the “x” icon for option that you would like to remove. For example, we want to remove for option 128 GB.
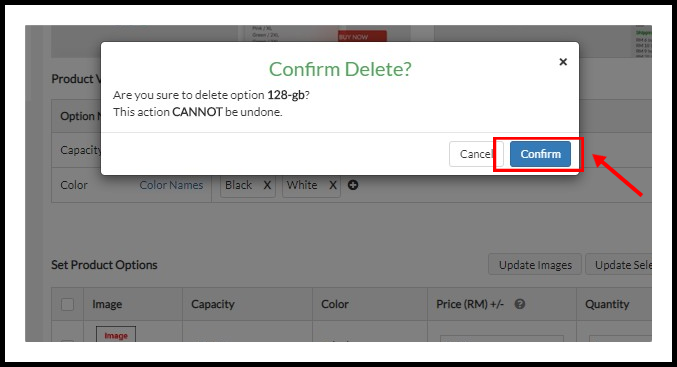
ii) A window will pop-out to ask for your action confirmation.Click on confirm button if confirm to delete the options. Once confirm delete, this action cannot be undone.
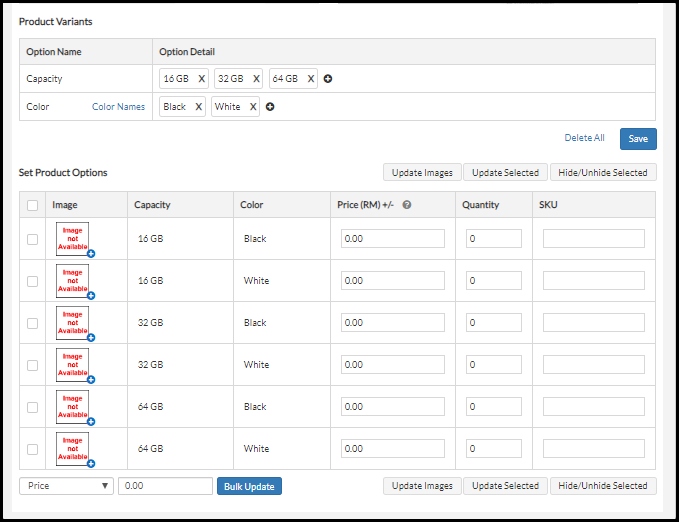
iii) Your deleted option has successfully removed from set product options as following.
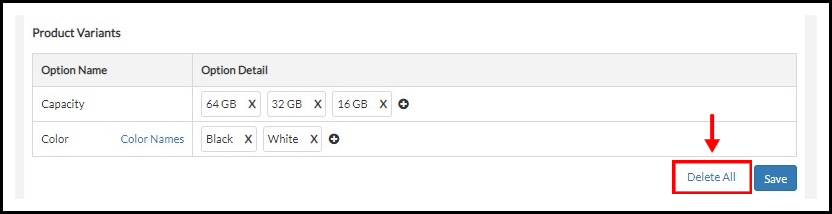
c. “Delete All” is to delete all the options that had created.
i) Click on the “Delete All” button
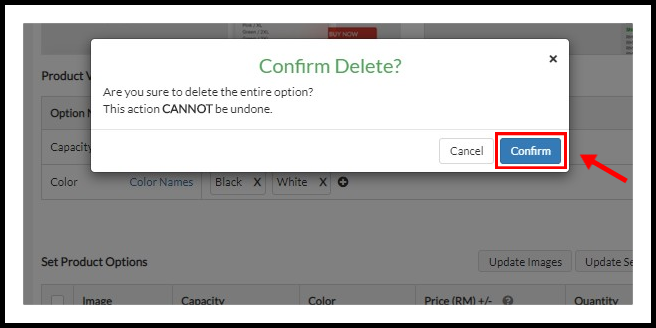
ii) A window will pop-out to ask for your action confirmation.Click on confirm button if confirm to delete all the options. Once confirm delete, this action cannot be undone.
iii) Your created options are deleted now.
Here is the example of your preferred display style:
Default Style:

Modern Style:
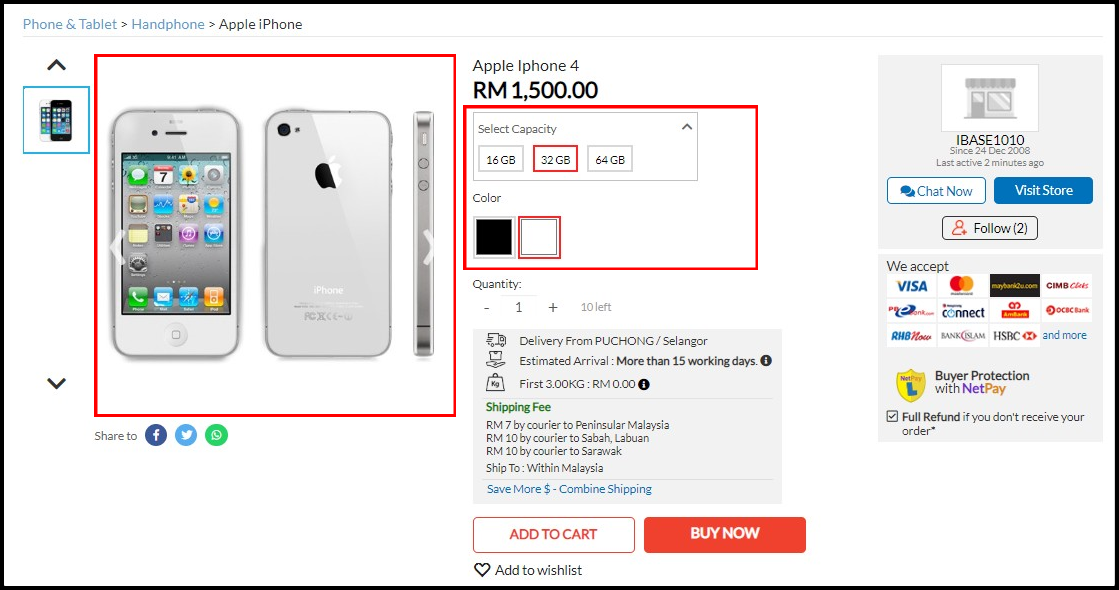
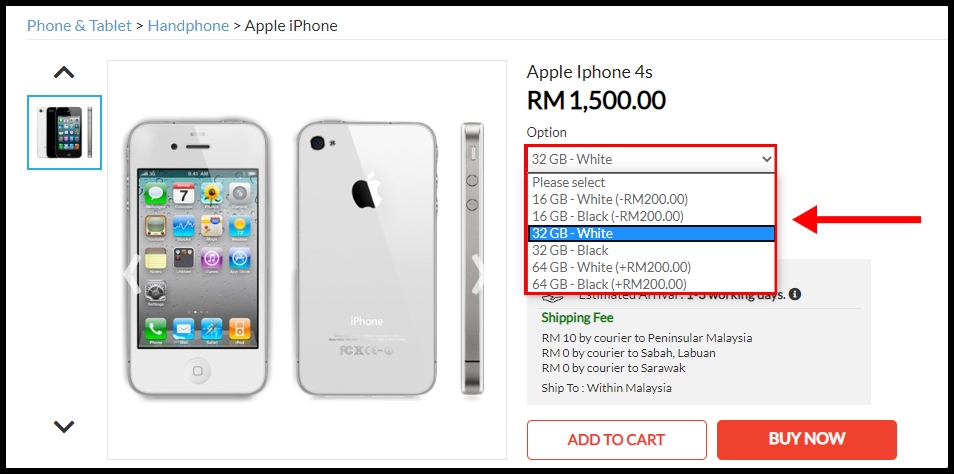
* Kindly note that the product option image will change once the buyer click the color option.